Okay so I used to struggle with this so much! I would try to make things looks sparkly and glowy and it would just all blend together and muddy and I'd cry into my digital tablet. (I'm only being slightly dramatic here, I'm sensitive okay??)
So last year I did a whole bunch of night time illustrations and I feel like I finally cracked the code and figured out the easy painting hack to make beautiful glowy illustrations, and I don't like to gatekeep so I'm sharing it all with you!!
So I did this officially in procreate, but yes you can do this in photoshop, clip studio paint and any art program that has layers and layer modes :)
Okay let's gooo....

The MOST important step here is to make sure you have a dark background and object. It doesn't have to be black, as you can see I'm using a pretty dark navy color. But the dark background allows the light glowy bits to POP. So you need that contrast
For steps 2 and 3 here you can either paint in the lighter area and then blur that layer OR... just use a soft brush. I almost never use soft brushes so I add in this extra step.
Finally set this lighter layer mode (also called a blend mode) to "add" it's going to REALLY create that contrast we are looking for.
If you're like, girl, what the heck is that. Here's a quick tutorial from procreate themselves. The "N" on the layer opens up these settings and you can change the opacity and choose a blending mode.
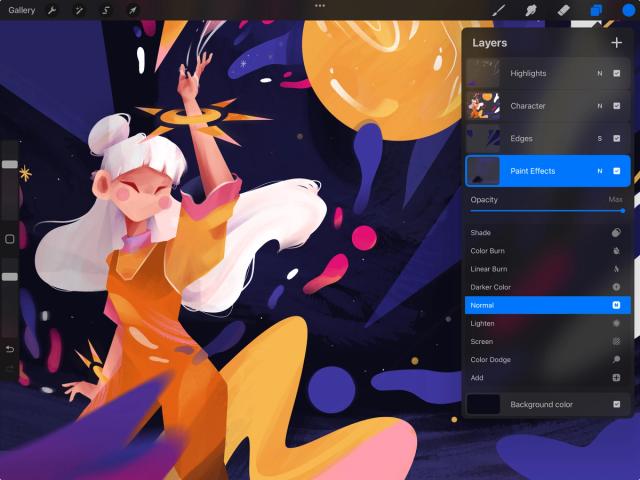
This is pretty similar in photoshop and other drawing programs.
Okay moving on:

Okay for this next step you're now going to add a glow behind your object on another layer. I personally still used a hard brush for this becaue I like texture, but you can use a soft blurry one. I think duplicated this layer 3x and played with the layer mode and opacity of each layer (as in how transparent or see through each layer is). For this illustraiton I did the following:
Layer 1: I blurred this layer using guassian blur, so it is softer with less texture, then I set the layer mode to "ADD" and then reduced the opacity down to 50%
Layer 2: I set this layer to ADD, and set it to 15% opacity
Layer 3: I set this layer to "Hue" and 65 % opacity.

Okay next up for fun I painted a trail using a yellow, and then on another layer I did a little bit of a shadow underneathe my trail (yes, I know we have a lot of layers going on, that's why my files are all crazyyyy).

Big finale time! I set the trail layer to "color dodge" and set the opacity to 25%
Now you can add stars and make those glow (or not) using the same steps you used on the star.
🤩 It's so pretty and magical and sparkly 🤩
This guide was created using procreate, if you'd like to use the custom brushes or textures that I use, check out my digital art bundle!
Check it out here