Drawing isn’t actually hard. You’ve just been taught how to draw really hard stuff before drawing easy stuff.
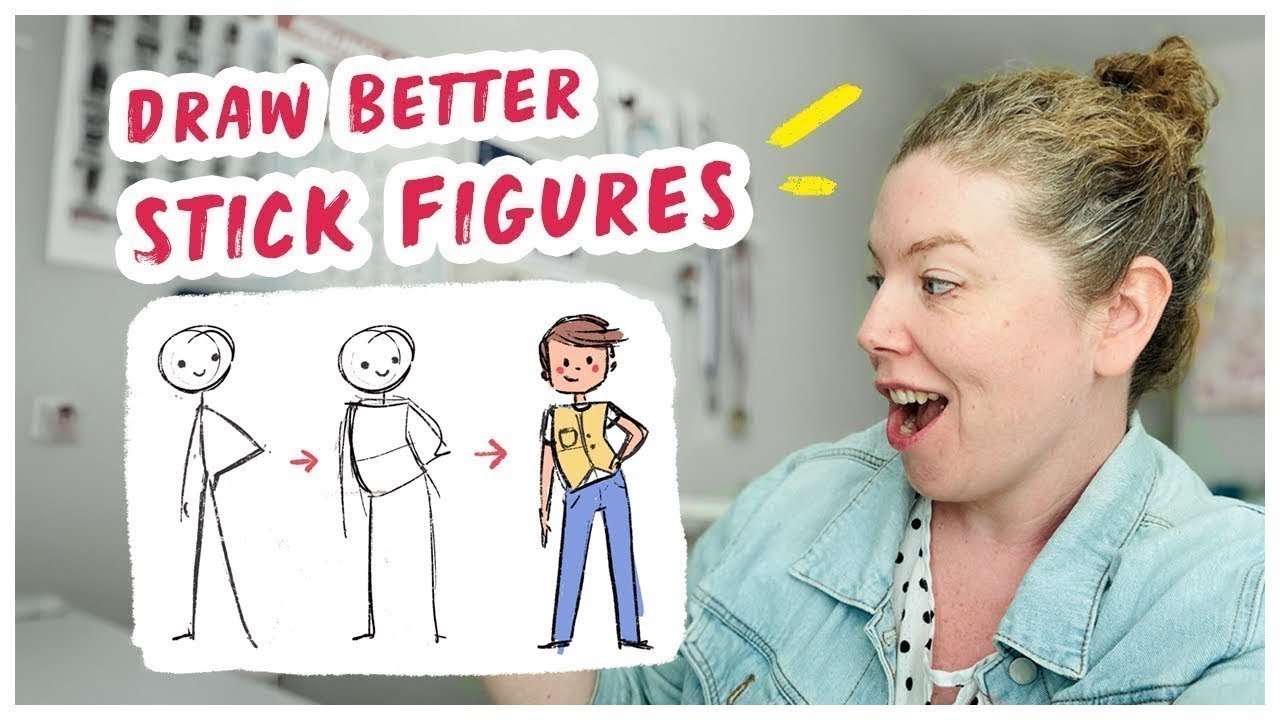
And today, we’re going to tackle the very first thing that I’m told is the reason you’re not able to draw...a stick figure. ✨
Not only will you be making some fabulous line-people, but I’m also going to show you how to transform that stick figure into a fully realized character in just a couple of easy steps.
Want to see this process done live? Or simply more of an auditory learner? Check out this video for the live step-by-step process!
So, without further ado, let’s get started!
Step One: Fix Your Stick Figure Proportions
This is generally what a new artist draws for their stick figure.
 As you can see, there’s:
-
A pretty long torso
-
Arms placed right in the middle
-
Some fairly long legs
However, at a glance, you probably can spot that the neck of a human is not usually that long.
So, we’re just going to change the proportions of our stick figure to match regular proportions a little bit more so that:
-
The torso is shorter
-
The arms come out near the neck and go just a little past the torso
-
The legs are generally longer than the torso
Already, you can start to see improvement!

Step Two: Practice with Line of Action
Time to get these stick men (and women!) moving!
I’m going to use the website Line of Action to give me some poses. This is a super cool resource that hosts thousands of references for people, animals, expressions, and even just shapes!
(Note from experience though, if there are kiddos in the room, be sure to double-check the model settings. Trust me.)
There’s no wrong way to start, but I often will put the head down first just to position where everything goes, and then sort of draw the spine so that I know the overall shape I’m going to do.

It’s totally okay to exaggerate and make it more dramatic than you actually see in real life.
Another way to start is with the line of action. Create the whole piece following the line you're looking for! Remember, too: done is better than perfect!
One of my favorite practice activities is to set a short timer and complete the doodle before the time runs out.
This stage of drawing figures should be more explorative. It’s okay to make mistakes and not get the pose right. It’s more about drawing a lot of poses and continuing to practice than about perfection.

Step Three: Upgrade to Block Figures
Once you’ve practiced drawing stick figures like this, you’re going to level up by using a box for the chest.
So instead of a line down the middle, we’re going to do a little rectangle shape.
-
Legs come off the edge of the central box
-
Arms come off the corners
-
These are your shoulders and hips
Check out the box vs. traditional stick figure design right here!

Now I had some questions the last time I did a blog like this:
What about people with different body proportions?
This is totally possible with a box design! Simply change the shape of your chest.
-
Narrow box = slender person
-
Wide box = broader person
-
Hourglass shape = more stylized figure (a little more advanced)
-
Inverted triangle = superman-type broad shoulders
Okay, now let’s draw with our rectangle guy.
Again:
-
Do a circle for the head
-
Use a box for the torso
-
Legs and arms come off the edges

As you get more advanced, you can have the box twist with your character’s pose:
-
One shoulder up, one hip up
-
One side squishes, the other stretches
-
Weight usually lands on the squished side, like maybe the leg is bent
You can do this from the side too—like an arched back pose.

That’s the Full Process!
From stick figure ➡️ to moving character!
Still too hard? Let me know in the comments! Answering your questions is what I’m here for.
And if you want to build confidence with your pencil, I have a workbook for you right here!
Happy Drawing
💖 Carlianne